
Accurate actual revenue figures are essential for informed decision-making across the business. This task is typically completed by a member of the night team once the day has concluded.
Actual vs Forecast
It's worth knowing the difference between these two figures within Revenue:
- Actual figures are the real revenue results for the day, usually taken from your PMS system. These are entered by the night team for the site.
- Forecast figures are entered in advance, usually for the week ahead, to help inform rostering needs.
This article covers entering Actual figures. If you're looking for guidance on Forecast, see the related article.
Before you Begin
- This task is usually carried out at the end of each trading day, once final revenue figures are confirmed.
- You'll need access to the Actual screen within Revenue.
Step 1: Navigate to Actual
- From the main menu, search for Actual
- Using the calendar function, select the week you want to add actual figures to.
Note: Alkimii will always default to the current week. As you're usually entering figures for the previous day's revenue, double-check you've selected the correct week before continuing.
Step 2: Review the revenue dashboard
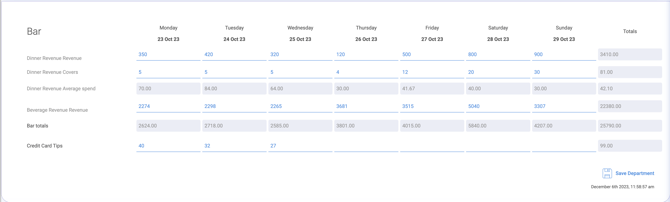
You'll see an overview listing all departments.
- Enter your figures into the blank fields marked with a blue line.
- Fields shown in grey calculate automatically based on what you enter in the blank fields, you don't need to fill these in yourself.
Step 3: Enter department-specific data
Different departments may ask for different figures, including:
- Number of Covers
- Number of Rooms Sold
- Sales Channel Revenue Only
- Credit Card Tips
Example: If the restaurant served 42 covers on the night, you'd enter 42 in the Covers field for that department.
Important: Credit Card Tips entered here will pull into the Week Details screen under Total Tips for Property when you add the monetary tips payment for your employees. Please make sure this step is completed.
Step 4: Save your entries
Once you're happy with the actual revenue entries for a department, click Save department.
Note: This is a working document, meaning multiple users can update different departments at the same time. We'd recommend saving regularly as you go, rather than leaving it all until the end.
A name, time and date stamp will appear at the bottom once you click Save department, confirming who entered the figures and when.

Made a mistake?
If a figure was entered incorrectly, simply go back through the same process to update it and click Save department again. The name, time and date stamp will update to reflect your most recent save.
Other Related Articles