In the realm of seamless communication, group chats play a pivotal role in fostering collaboration and facilitating efficient discussions. For users navigating the dynamic features of Alkimii's chat platform, mastering the art of creating, managing, and updating group chats is a gateway to enhanced communication experiences. Our step-by-step instructions will walk you through the process, ensuring you can create, manage, and update group chats with ease.
To create, manage and update group chats, specific permissions are required. If you need this permission to be added to your Alkimii access, please contact our customer success team at hello@alkimii.com
|
 |
|
 |
- Within the Group Chat Settings, you will see all group chats for your site.

How to Create a Group Chat
- In the top right corner of the settings view, select "Add Group"
- A modal will appear where you can enter details for this Group Chat. You must give it a title and have the option to add an image to personalise the chat.
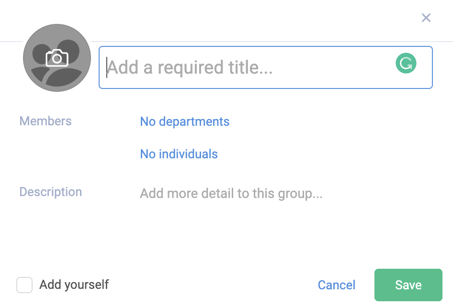
- If you would like to include all members of a specific department in the group chat, select the department from the dropdown menu.
- If you wish to only add specific individuals you can do so by searching their name using the search bar function or scrolling through the list of employees and selecting them. For example, if you were creating a Heads of Department group chat for your site.
- You can add both departments and specific individuals to the group chat as well if you need someone outside the department to be included in the group chat.
- You can add a description to give more detail to the group chat, if needed.

- If you want to include yourself in the group chat, select "Add Yourself". This is useful for HR Managers who would like to monitor and be involved in each of the department group chats.

- Once all the details are entered, you can "Save" the group chat to create it.

- This group chat will now be visible to the select individuals under the "Groups" list on the chat view.
Please be advised that read receipts are always sent for group chats. Learn more about read receipts here!
How to Manage and Update Your Group Chats
You have the ability to add or remove specific individuals to and from the group chat.
- Again, navigate to the gear icon to access your group chat settings.
- Click on the group chat you wish to update
- If you wish to remove a department, simply hover over the department name which appears in blue, click the "x" to the right of the department name and "Save".

- Select the dropdown list of individuals
- To add an individual, simply search for their name using the search bar function or scroll down through the list of employees, and click on their name. A blue tick will now appear beside their name to confirm the selection. And lastly, "Save" the group chat.
- To remove an individual, simply search for their name using the search bar function or scroll down through the list of employees, and click on their name. This will remove the blue tick that appears beside their name when they have been selected. And lastly, "Save" the group chat.