- You can select the News icon from anywhere within Alkimii, it is the newspaper icon in the top right navigation bar.
- You can either view the news within any screen by scrolling down through the posts or click on the "Open News" to access the full-screen News.

Explore our Quick Links
Filters & Tagging
- In the full-screen newsfeed view, you will now be able to filter and search for newsfeed posts that you have access to.

- You can filter by scheduled posts, tags, authors, and moment types dropdown menus or simply use the search bar function for quicker location.

- Tags can be added when creating a news post so that the right audience is targeted. They simplify information retrieval for users who may not regularly utilise the News, ensuring everyone stays up-to-date with the latest information.
Tags are the latest feature to be introduced to News to ensure that no vital information goes unnoticed, whether it's a tag for job advertisements, CEO announcements, training and development updates, health and safety alerts, green team initiatives, or senior leadership communications.
- Once a filter has been applied, you can save the view for future use by clicking on the 3 vertical dots on the right and selecting "Save Current View".

- This view will now be available to select from the "Saved Views" dropdown menu for your convenience.

View & Interact with the News
- The News is available to view on any screen of Alkimii. Simply select the newspaper icon in the top right.
- From this view, you can scroll through the posts available to you.
Depending on your access level, you may be able to see additional features. If you have any questions, please don't hesitate to contact our customer success team at hello@alkimii.com
- You can now view the recipients who were given access to view this post by selecting the group icon in the top right corner of the post. This can be specific to a site, department or individuals and the number of options chosen will appear in a grey bubble.

- Your colleagues can interact with the post directly, with "Like" reactions, comments and "Chat with Me", if you have enabled direct chat.
- You can check user engagement with your News post from the "Views" icon or check the number of comments on the post.

- Your team can also engage with the comments left on posts by using reactions as well as commenting and tagging specific recipients to show acknowledgement and support.

Create a News Post using Media or Documents
- You can create a News post either within the modal on any screen or within the full-screen newsfeed screen.
- To create within the modal simply select "Create a Post"

- To create within the full-screen view, select either "Media" or "Document"

If you choose to create the post from within the full-screen view, you will need to select your media uploads from your files on your system. Once selected you can continue to enter the remaining information.
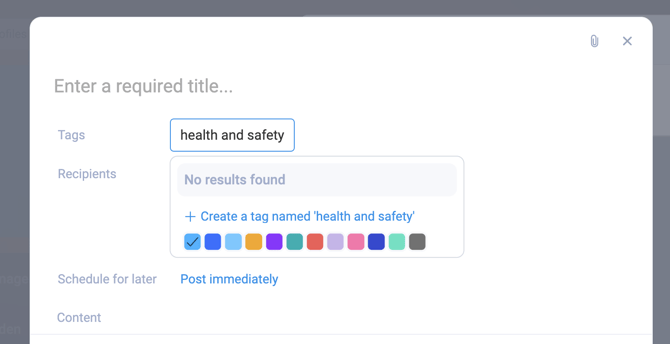
- Add a Title, this will be displayed in bold at the top of the News post
- Add any tags, if applicable. If the tag you want to use is not available from the dropdown menu, you can type it anyway and "create a tag named 'health and safety' " for future use.
Remember tags are a great way to ensure that no vital information goes unnoticed, whether it's a tag for job advertisements, CEO announcements, training and development updates, health and safety alerts, green team initiatives, or senior leadership communications.
- Select the recipients at Site level, Departments and/or Individuals from the dropdown menu. Your post must have at least one recipient.
- You can schedule your post to publish immediately or schedule it to publish for a specific time or date in the future by using the calendar function.

- Enter the body of text you wish to display on your News post. If you wish to add a link to a website, please ensure that you copy the full URL from your browser and simply paste it into the body of the content. If the link is particularly long, our URL shortening feature automatically generates compact URLs once the shared.

- You can mention an employee within the body of the text, simply type "@" followed by the employee's name

- You can use the format buttons to draw attention to particular pieces of text, if applicable.

- If you need to attach an image, video or PDF document, you can upload multiple attachments to the post. Simply select "Add Media" or "Add a document" and choose a file from your system.
Here is some more information on the different attachments supported files you can add:
Image: 'png, jpeg, heif, heic, webp, bmp, tiff'
Video: 'mp4, x-msvideo, mpeg, mov',
Document: 'pdf, msword, vnd.openxmlformats-officedocument.wordprocessingml.document, vnd.ms-excel, vnd.openxmlformats-officedocument.spreadsheetml.sheet, text/csv, text/plain',
If the fillable fields appear blank in the PDF when you post it to News, please follow this troubleshooting guide.
- To enable the "Chat with me" option, ensure the "Allow direct chat with author" box is ticked. This will allow your colleagues to message you directly from the post on your newsfeed.
- Click "Save" to post your news. If you have scheduled the post for later, this will be saved as a draft until the scheduled release.
Only the author will be able to see the drafted post on their News!
- You can edit or delete your posts by selecting the 3 vertical dots to the right

Celebrate a moment using News
- You can create a News post either within the modal on any screen or within the full-screen newsfeed screen.
- To create within the modal simply select "Create a Post" and select "Celebrate a moment" from the options available

- To create within the full-screen view, select "Celebrate a moment"

- A pop-up will prompt you to select an upcoming moment that you wish to share or schedule to share on the News.

- Use the dropdown menu to select the moment and click confirm in the bottom right to start creating your post

- Depending on the moment type, templates will be available for selection. If you do not wish to use the templates and would like to upload your own personal design, you can select "upload an image"

- If you selected the wrong moment, you can also amend the selection by clicking "Choose a different moment"
- Once you are satisfied with the image, click "Confirm"
- You will notice that the image, title, recipients, schedule for later (date of the moment) and content fields have all auto-populated based on the moment selected. You can amend any of these as you wish.
- You can also add a tag for this post as they are a great way to ensure that no vital information goes unnoticed.

- To enable the "Chat with me" option, ensure the "Allow direct chat with author" box is ticked. This will allow your colleagues to message you directly from the post on your News.
- Once you are ready to save your post, click "Save" in the bottom right corner. If you have scheduled the post for later, this will be saved as a draft until the scheduled release.

Only the author will be able to see the drafted post on their News!