Alkimii Productivity is designed to optimise workforce efficiency by streamlining rostering and providing actionable insights into labour management.
By setting clear productivity standards, you gain a data-driven approach to staffing, ensuring you have the right number of employees in place at the right time. These insights are directly linked to forecasted demand, helping you maintain operational efficiency while maximising workforce effectiveness.
💡 If this is your first time creating standard, review our key components guide for support
To create a new standard
- Click Create standard in the top right of the screen.
- Choose whether this standard applies to a Job title or a Department. Most sites now set standards up at department level.
- The Site field automatically fills in with the site you're currently working in. If this standard applies to a different site, you can amend this here if you have access to multiple sites.
- Select the Department (or Job title) from the dropdown list. This is a mandatory field, so you will not be able to save without selecting this.
- Enter the Hourly rate to this standard, if applicable.
- Choose whether this is a Fixed or Variable standard. This cannot be changed once saved, so be mindful of this selection.
-
- Fixed: a set number of hours is required for this department or job title, regardless of demand. If the site is open, those hours are always in place. For a Fixed standard, you'll only need to enter the hours and minutes required per day, there's no basis or range to set.
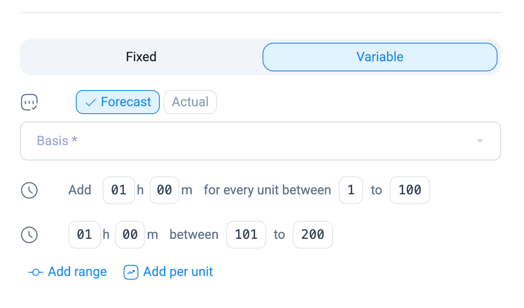
- Variable: hours flex up or down based on demand, using a forecasting metric such as arrivals, departures, stayovers, revenue, or covers.
If you've chosen Variable, continue as follows:
- Choose Forecast or Actual. This decides where your Basis list pulls its options from. Forecast pulls in the line items from your Revenue Forecast, which is what drives your rostering ahead of time. Actual pulls from your Actuals once the period has closed, useful for checking how a standard performed against what really happened. Forecast is selected by default.
- Enter the Basis. This is a searchable list, pulled directly from the line items already set up in Revenue, under Manage Data and Forecast (or Actuals), grouped by category. This field is mandatory, and it means your revenue and productivity data are always working from the same numbers.
⚠️ ForAccommodation standards: search for metrics like Rooms Sold, Departures, or Stayovers, are configured for you by the Alkimii team on the backend, and are channels that don't contribute to your revenue totals. If you don't see these options yet, reach out to your Alkimii contact to get them added.
- Build your range using Add range and/or Add per unit:
-
- Add range gives a flat number of hours for a whole band of demand, reading as [hours]h [minutes]m between [X] to [Y]. For example, 8 hours between 500 and 800 of revenue means that whole band gets 8 hours, however the revenue falls within it. This suits departments where demand doesn't scale smoothly but jumps at key thresholds instead, like Conference & Banqueting or Bar.
- Add per unit adds hours incrementally, for every unit within a band, reading as Add [hours]h [minutes]m for every unit between [X] to [Y]. For example, 30 minutes for every stayover between 1 and 60 means more stayovers results in more hours, scaling up steadily. This suits departments where each extra unit adds a similar amount of work, like Housekeeping or F&B.
- Each department in our own worked examples uses one approach consistently, rather than mixing the two, so we'd recommend the same until you've had a chance to test otherwise.
Continue for both Fixed and Variable standards:
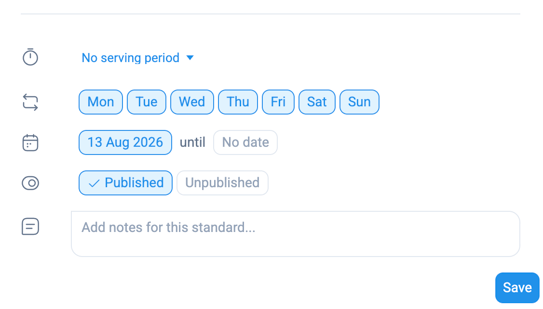
- You have the option to select a Serving period, if this standard is specific to a period of time in the day. For example, Breakfast (05:00–11:00).
- Select the days of the week that this standard should apply on.
- Select the Effective from date, you can schedule this to start in future. You also have the option to apply an Effective until date, should the standard only be seasonal. If Effective until is left blank, this will never expire.
- Choose whether this standard is Published or Unpublished. Published means it will actively guide your supervisors as soon as you save. Unpublished saves the standard as a draft, letting you build and check it first, without it affecting live rostering.
- Optionally, add Notes for this standard, useful if you want to record why it was set up a certain way, for your own reference or for a colleague.
- Once you're satisfied, click Save to create the standard.