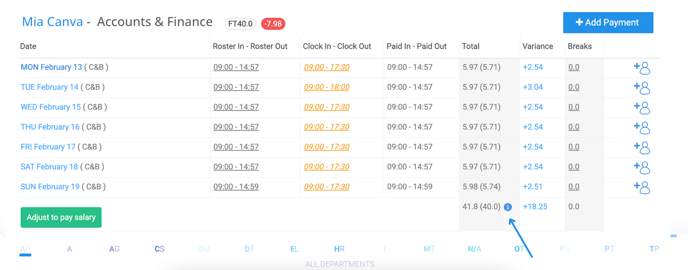
How to Adjust Hours in Week Details?
This article will show you how to use the "Adjust Hours" feature in the Week Details screen.
Your employee may be needed to work over the contracted hours. When payroll comes around you may need to adjust these hours to ensure they are meeting the contracted hours.
The "Adjust hours" option will only appear when the day has been signed off and when the Clock In - Clock Out column does not match the Roster In - Roster Out column
- Using the mega menu, navigate to "Week Details"
|
 |
- Scroll through your list of employees
- A green "Adjust hours" button will be visible under employees who have over worked their contracted hours.

- Click on the button and you will be directed to a pop-up.
- In this pop-up, you can manually update individual shifts using the increase/decrease arrows under the "Paid Hours" column. Any excess hours will be moved to variance.

Please be advised "Adjust All Shifts" will not be available if the employee has clocked in late. However, you have the ability to manually adjust each individual day.
- If there is a balance in the variance column, you have the ability to add the variance into "PUOT" under actions.
|
|
-
- To save time, there is also an option to "Adjust all shifts", this will automatically update all normal shifts moving any excess to variance with the ability to move these hours to "PUOT" options under actions.
- You have the ability to revert any changes made before saving your adjustments by clicking on the "x" under actions

- Once you are happy with the adjustments made, click "Save"
- You can repeat this process for all relevant employees
- If you need to revert the changes you have made, you can do so by clicking on the blue "i" under the Total column

|
 |
