
Proactive Maintenance lets you set up recurring checks for your property — for example, daily fire door checks or weekly balcony inspections. Once set up, the system creates these checks automatically, so your team never misses one.
This article shows you how to:
- Create a new Proactive Maintenance
- Build your inspection (add areas and tasks)
- Manage your Proactive Maintenance list
- View progress on an inspection
- Understand your Health Score
Please note: This article covers setting up and managing Proactive Maintenance from the web app. The actual checks are completed by your team using the mobile app, see our separate article on completing Proactive Maintenance checks on mobile for that part.
1. Create a New Proactive Maintenance
- Go to Property > Proactive Maintenance.
- Click + Add Proactive Maintenance in the top right corner.
- A window will open. Fill in the following: Title Give your Proactive Maintenance a clear name, for example "Weekly Fire Door Check". This helps your team know what it's for.
- Rooms Choose which rooms this check applies to:
- All rooms – the check applies to every room in the property.
- Select rooms – choose either a full area (set up in your app settings) or specific individual rooms and locations.
- Visiblity Add the users or department who should have visiblity over this inspection whether thats by departments, or additional individuals
- Frequency Choose how often the check should happen: Daily, Weekly, Monthly, or Yearly. The options change depending on what you pick:
- Daily – choose a time.
- Weekly – choose which day(s) and a time.
- Monthly – choose which month(s) and a time.
- Yearly – choose a time.
- Description Add any extra details or instructions your team should know before starting the check. This box is optional.
- Locked Toggle this option on if you want to lock the Proactive Maintenance. This stops anyone else from making changes to it once it's set up.
- Click Save.
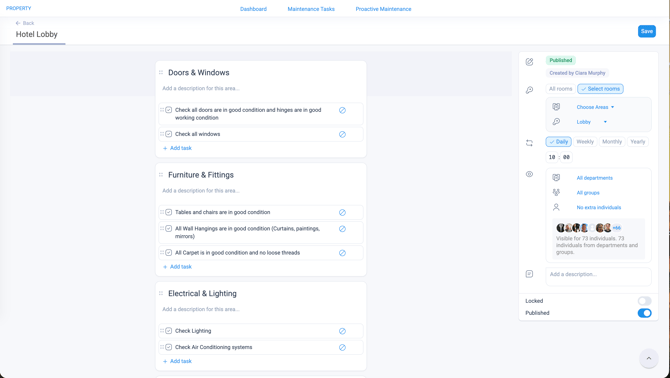
Once saved, you'll move into the builder view. This is where you build out the full inspection and adjust your settings and toggle Published once your checklist is ready to go.
2. Build Your Inspection
The builder view is made up of two parts: your settings on the right, and your Areas and Tasks in the main part of the screen.
Settings panel (right-hand side)
Here you can review or change everything you set up in step 1, plus a few extra options:
- Status – shows whether this Proactive Maintenance is currently a Draft or Published.
- Created by – shows who set it up.
- Rooms – choose between All rooms or Select rooms.
- Choose Areas – if you've selected specific rooms, use this dropdown to pick a pre-configured area (for example "Hedge 1 and 2 more" shown here), or pick individual rooms and locations. To set up an area, head over to your app settings.
- Frequency – Daily, Weekly, Monthly, or Yearly, with the matching time settings.
- Visiblity – choose between Departments or Select indviduals.
- Description – add or edit notes for your team.
- Locked – toggle on to stop others editing this Proactive Maintenance.
- Published – toggle on when you're ready to make this Proactive Maintenance live. While this is switched off, it stays as a Draft and won't run.
Building your checks (main screen)
- Click + Add area to create a new area. An area is a group of related tasks, for example "Garden" or "Fire Safety".
- Give your area a title, and add a description if it's helpful for your team.
- Click + Add task to add individual checks to that area. Repeat this for every check you need within the area.
- Use the three dots (⋯) next to an area for further options, such as reordering or removing it.
- Click + Add area again to add as many areas as you need. Each one can have its own set of tasks.
- When you're happy with your checks, click Save in the top right corner to save your changes, then switch the Published toggle on when you're ready to go live.
👉 Marking a check as N/A: If a task doesn't apply to a specific room (for example, a balcony check on a room with no balcony), your team can mark it as N/A (Not Applicable) while completing the inspection on the mobile app. This tells the system to skip it for that room, and it won't count against your Health Score.
3. Managing Your Proactive Maintenance List
Go to Property > Proactive Maintenance to see all your Proactive Maintenance items in one list.
Filters Use the search bar or the filters at the top to narrow down the list:
- Created by – filter by the team member who created it.
- Status – filter by Draft or Published.
Columns explained
- Title – the name of the Proactive Maintenance.
- Created by – who set it up.
- Status – shows if it's a Draft or Published.
- Health Score – shows the current score for this check (see section 5 below).
- Frequency – shows how often it repeats.
- Latest date – the most recent date this check ran (or is due to run).
- Progress – shows how many checks have been completed out of the total.
Quick actions Click the three dots (⋯) next to any item to see your options:
- View progress – see how the current inspection is going (see section 4 below).
- Create new inspection – start a fresh inspection for this Proactive Maintenance. This will reset all current progress, so use it carefully. You'll be asked to confirm before this happens.
- Edit – change the title, rooms, frequency, description, or locked setting.
- Delete – permanently remove the Proactive Maintenance.
4. Viewing Progress
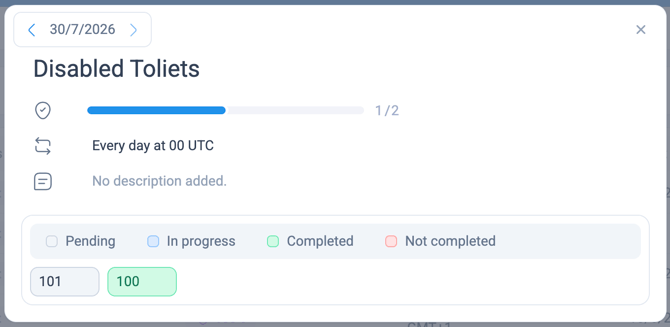
Click View progress from the three-dot menu to see the current status of an inspection.
Here you'll see:
- The date of the inspection, with arrows to move between previous and upcoming dates.
- The title and frequency of the check.
- A progress bar showing how many checks are complete out of the total.
- Each individual room or location, shown as a tile. Every tile is colour-coded to show its status:
- Pending – not started yet
- In progress – started but not finished
- Completed – finished
- Not completed – the check was missed or not finished in time
This view is a quick way to see exactly which rooms still need attention.
5. Understanding Your Health Score
If Health Score is enabled for your property, it reflects how well your Proactive Maintenance checks are being completed.
-
The score starts to change once your team begins completing the inspection.
-
If a check results in a maintenance task being created (for example, something is found to be broken or unsafe), this will lower the Health Score.
A lower Health Score is a helpful signal that there may be more maintenance issues to follow up on for that property.
💡 Tip: If you're not sure whether to mark a check as N/A or leave it as part of the inspection, ask yourself: "Does this apply to this specific room or location?" If not, mark it N/A rather than leaving it incomplete.